Access
Introduction
You can access the NSDK in three ways, depending on where you are in the development lifecycle:
- Testing and evaluation: You just want to try sample apps.
- Proof of concept: You want to reuse the sample login in your own app.
- Production applications: You want to integrate your own identity with Niantic Spatial authorization.
The following table summarizes these approaches:
| Development Stage | Access Solution | Who Handles Tokens | What Developer Does | Notes |
|---|---|---|---|---|
| Testing and evaluation | Use your Scaniverse account to log in to the sample app. | Sample app / Niantic Spatial Identity Service | Run the sample app, log in, explore NSDK features. No backend or API key required. | Tokens are managed automatically by the sample. |
| Proof of concept | Copy the sample login flow into your own app. | Client app using sample flow | Integrate sample login code into your app; test NSDK features locally. | No backend required; token handling is client-side. Supports local multi-user testing. |
| Production applications | Combine your own identity service with Niantic Spatial authorization. | Backend server + client | Implement full backend token flow; request, refresh, and validate access tokens in your app. | Requires service account and API key; enforces secure multi-user access and token expiration. |
Start with the testing flow first, which requires no backend server. Production applications require a backend server and a service account.
Testing and evaluation
The sample apps demonstrate the full login and token exchange flow used to authorize access to NSDK services. You can try the NSDK using sample apps for Swift, Kotlin, and Unity. Certain NSDK features require authentication tokens. The sample app handles all token management automatically.
During testing, try the sample app quickly to understand NSDK behavior as follows:
- Use the sample app as-is.
- Scaniverse login handles all tokens automatically.
- No backend, no API keys, no manual token handling.
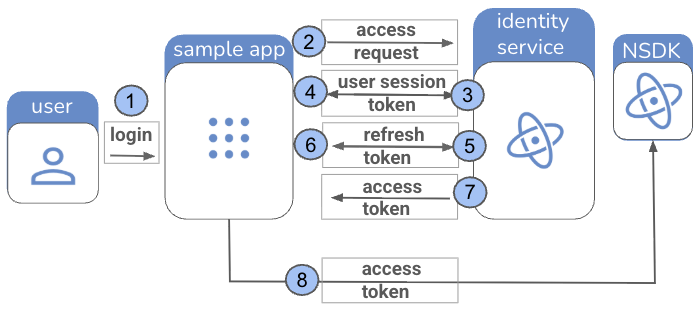
The testing flow is summarized in the following table:
| Step | Actor | Action / Token |
|---|---|---|
| 1 | User | Opens sample app and logs in with Scaniverse account. |
| 2 | Sample app | Sends access request to Niantic Spatial Identity Service. |
| 3 | Niantic Spatial Identity Service | Returns user session token to sample app. |
| 4 | Sample app | Sends user session token to Identity Service to exchange for refresh token. |
| 5 | Niantic Spatial Identity Service | Returns refresh token to sample app. |
| 6 | Sample app | Uses refresh token to request access token from Identity Service. |
| 7 | Niantic Spatial Identity Service | Returns access token to sample app. |
| 8 | Sample app | Accesses NSDK services using access token. |
The testing flow is shown graphically in the following workflow diagram:
To try the sample apps:
- Create a Scaniverse account.
- Follow the instructions through Build and run in the First Localization guide.
- Run the sample app. You’ll be prompted to log in with your Scaniverse account.
Access tokens are short-lived and are automatically refreshed by the sample using the refresh token. You do not need to manage tokens manually when using the sample apps.
Testing with the sample app does not require your own backend or API key. All token handling is internal to the sample.
Proof of concept
In the second stage of development, integrate the sample login flow into your own app. Test NSDK features and build a small prototype without setting up a backend as follows:
- Copy the sample login flow into your own app in either Swift, Kotlin, or Unity.
- Your app handles tokens automatically, as in the sample app, with no backend required.
- Token management is still client-side. You don't need a service account or an associated API key.
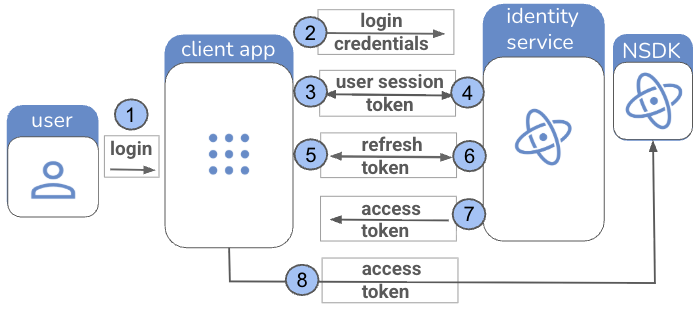
The proof of concept flow is summarized in the following table:
| Step | Actor | Action / Token |
|---|---|---|
| 1 | User | Logs in to your app with Scaniverse account. |
| 2 | Client app | Sends login credentials to Niantic Spatial Identity Service. |
| 3 | Identity Service | Returns user session token to client app. |
| 4 | Client app | Sends user session token to Niantic Spatial Identity Service to request refresh token. |
| 5 | Identity Service | Returns refresh token to client app. |
| 6 | Client app | Sends refresh token to Niantic Spatial Identity Service to request access token. |
| 7 | Identity Service | Returns access token to client app. |
| 8 | Client app / User | Accesses NSDK services using access token. |
The proof of concept flow can also be shown visually in a workflow diagram:
Production applications
For production apps, implement a secure backend token flow to manage NSDK access. Unlike testing or proof-of-concept, tokens are handled by your backend, not the client. This ensures secure multi-user access and enforces token expiration.
When developing an app for production applications, build a full pipeline with proper security and a token flow:
- Implement your backend for token issuance.
- The client requests tokens from your backend and passes them to NSDK.
- Your app handles multiple users securely and enforces token expiration.
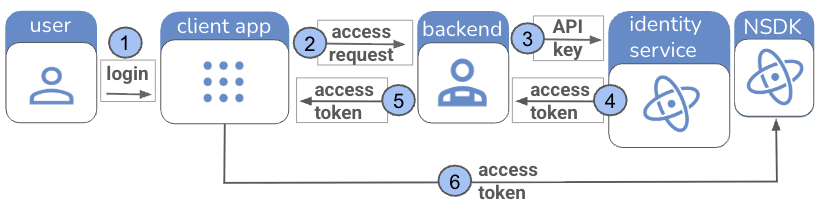
The production token flow is summarized in the following table:
| Step | Actor | Action / Token |
|---|---|---|
| 1 | User | Logs in to your app. |
| 2 | Client app | Sends access request to backend. |
| 3 | Backend | Uses service account/API key to request access token from Niantic Spatial Identity Service. |
| 4 | Identity Service | Returns access token to backend. |
| 5 | Backend | Returns access token to client app. |
| 6 | Client app / User | Accesses NSDK services using access token. |
The production flow can also be shown visually in a workflow diagram:
Next steps: backend and client code integration
When you’re ready to move beyond testing with the sample app, the NSDK workflow splits into two areas:
- The backend handles token issuance and management.
- The client integrates those tokens in your app.
Learn more from these detailed guides:
- Backend integration – How to issue, refresh, and manage production access tokens using your own backend service account.
- Client code integration – How to set, validate, and clear access tokens in Swift, Kotlin, and Unity apps.